


Looking to explore how to integrate workflows between Clinked & other software products? The time to explore & learn how is now!
Recently, our team hosted a client webinar to deep dive into a "How To" on using Zapier to help Clinked clients to integrate, automate and innovate within their software ecosystem. Our team discussed how to scope, setup workflows & shared examples of popular integrations. We're here to share this knowledge so you can get exploring on how Clinked can be used within your team's processes to work better with your clients. Enjoy!

Firstly, what is Zapier?
Zapier connects hundreds of leading software products to create automation of workflows between two apps saving time and creating efficiencies. As an example, an automated workflow can be setup between Dropbox and Clinked, so when a file is uploaded into a specific Dropbox folder a duplicate is saved within specific folder of a Clinked group. It’s also super simple to quickly connect up your favourite software products!
To start exploring how to use Clinked with other applications using Zapier, sign up on their website for a free account so you can look at how to connect and integrate workflows.
Here's additional information to help with your exploration:
- How can I access Clinked’s Zapier integration?
- How do I create a zap?
- Example of creating a zap
How can I access Clinked's Zapier integration?
Go to Zapier's Clinked Integrations page to start exploring the other software products available to connect with directly from Clinked. Alternatively, search for the software products used within your organisation and explore how it can be connected with Clinked.
This search can happen without an account. However, to move forward with testing, you’ll need to create a free account in Zapier and use your software product logins to connect them.
How do I create a zap?
Zapier uses triggers and actions to automate tasks between two software products. A trigger is an event in one application. An action is an event initiated by the trigger within a different application.
Here’s how:
-
- Log in to your Zapier account
- Click “Make a Zap”
- Choose the Application to create the trigger
- Select the trigger you would like to use
- Click Save + Continue
- You will then be asked to connect an account, choose Connect an Account and then login using your login credentials for the Application
- Once your account is connected, you’ll be asked to Set Up Trigger Options, specify as needed then click Continue
- Next, you need to set up an action, choose + Add a Step
- Select the app for the action take place in based on your trigger, if you would like your trigger to initiate an action within Clinked then select Clinked, or use the search bar to find another app
- Select an Action, then Save + Continue
- If you haven’t previously connected the selected app with Zapier then you will need to sign in, enter your credentials then choose Save + Continue
- Next, you will need to set up a template for the action – add the necessary details then select Continue
- Finally, you can test your zap if needed or you can choose Skip Test and select Finish to complete the setup of your zap
Example of creating a zap: Google Calendar
Clinked members will know that using the Events Tool within Groups automatically sends an event invitation booking to the calendar of those invited (i.e. All Members or specific invitees). These event invitations will sync directly into that user's calendar that is connect with their email address. That way if your clients and group members are using different calendars such as Google Calendar or Office, there is no need to do anything other than accept the invitation. This one way direction of Event management makes it easy for Group Admins and Group Members, to know when they are meeting or when a task is due as part of their workflows.
We've been increasingly asked by clients to allow for syncing from other calendars into Clinked Groups. We think this is a great idea, however there are many variables that comes into the equation so we've found a way for you to do this using Zapier!
This way you can customise the workflow that works best for your organisation and Groups. Let's explore how to do this through the example of creating an event in Clinked that sends an event to Google Calendar:
Step 1: Click “Create Zap” or "Make a Zap" - either use Button 1 or Button 2 highlighted below:


Step 2: Choose Clinked as the application to create the trigger:

Step 3: Choose the trigger of creating a “New Event”

Step 4: Log into your Clinked account:

Step 5: Choose the Clinked group where the trigger will happen and select continue:

Step 6: The below view will then pop up for you to ‘Test Trigger’:

Step 7: Once the test has been completed, review to validate the data coming through and select continue. (Or revisit your steps if there was an error)

Step 8: Select the Software Application supported by Zapier that you’d like to have the action occur. In this instance, we’re exploring Clinked and Google Calendar.

Step 9: Select the action you wish to happen in the second application (i.e. when a calendar event is created in the Clinked group then create an event in my Google Calendar) and continue:

Step 10: Log into your account in the software application:

Step 11: Choose the information properties from the trigger source (i.e. Clinked Group) that you’d like pulled in to create the action (i.e. Google Calendar) then click test and continue:

Step 12: Test will start. If successful, you’ll see a screen similar to below. If for some reason it does not, you will need to retrace your steps and troubleshoot (i.e. test different properties) to get it correct:

Go into the location of the action and check to make sure the results come through as expected.
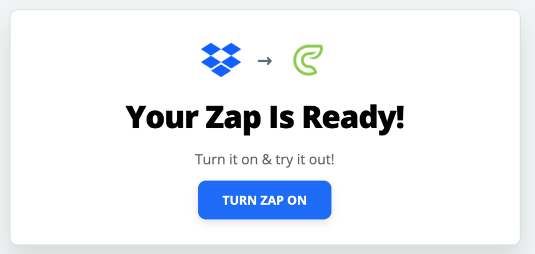
Now your Zap is ready! Select done editing and decide when you want to turn it on.

You then have the option to switch it on or keep it off until you need it. Come back to Zapier to edit any Zaps created to turn on and off or edit accordingly.
Thanks for exploring how to use Zapier along with Clinked! We hope you've enjoyed reading about these steps to scope potential integrations with other leading software products, that are used internally through your organisation to deliver client or partner facing activities.
Curious to talk with our team about your organisations challenges today? Schedule up a time to speak with our team now below:

Happy exploring, integrating & automating!


Let Us Know What You Thought about this Post.
Put your Comment Below.